I was invited by the staff of Wirestrungharp.com to document and report on my recent excursion into the world of home recording. This process has gone incredibly swiftly for me, from purchase of a microphone, finding the right acoustic and recording settings with my equipment, to mixing and uploading my work for the world to hear. I trust that, after reading this article, some of you may be able to do the same, and share the voice of your wire–strung harps soon.
I have done my recording with my trusty, 27 string, nylon-strung clarsach. I apologize for not yet being up to speed with the older, more venerable variety of the instrument, but I hope to include wire–strung clarsach to my collection soon. For information specific to your more sonorous-voiced instrument, please visit the amplifcation pages.
As we proceed, I will refer to my personal purchases and equipment. I am not endorsing any particular products, or ways of doing things. If you can find other programs and recording equipment, or ones that better suit your taste, by all means, use them to create. Also, I am learning as I record, and vise versa. I am reporting on this to illustrate that you do not need to be a professional, or have extensive training to make a decent recording. This article is intended to be the start of a dialog here at Wirestrungharp.com, and to inspire you by example. It doesn’t take millions to produce a decent demo any more, or to produce work that you can feel proud about sharing with others. I hope that I can help you along the path, and further increase the voice of the wire–strung harp.
Though I am no expert, I am no stranger to recording. I worked tirelessly in the early to mid 1990s in a Celtic outfit called The Spriggans. We were an erstwhile group of college friends who loved Celtic music, and our passion took us to perform and record it. Some of us formed a rock group afterwards, and continued to make recordings. Our efforts were with simple live recordings via portable, digital audio equipment, to varying levels of multi–track, digital and analog studio recordings. Another member of the two bands acted as producer, overseeing the process, so I was largely hands–off at the time. But I was able to watch, and learn by observation. The process and the product fascinated me, and I knew that some day I wanted to be able to do my own recordings.
Many years have followed since then, and I have held on to the idea that I would eventually be able to make my own recordings. As the technology changed digital recording programs improved, and became readily available to more people. When I purchased a new laptop, equipped with the latest version of a recording application, I did a little research to see if it would be possible to record my harp in an affordable manner.
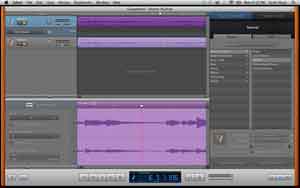
To get started, you will need two basic items, a decent microphone, and a program that allows you to record and mix onto your computer. I was in luck as my laptop came equipped with Garage Band, a digital recording package that allows one to multi–track instruments, and even create music with sampled sounds via a keyboard, or the with the keypad of your computer. There are many other affordable programs available for download from the Internet. I have not researched them extensively, but know many folks who use them. I suggest doing bit of research before you invest.
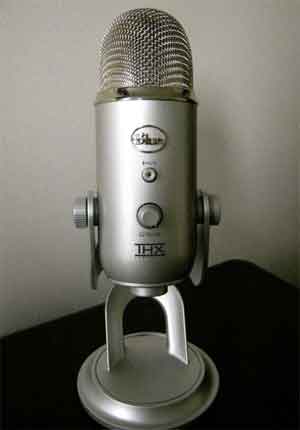
The Yeti microphone by Blue Microphones
Since I already owned the recording program, I needed to find an affordable microphone. I knew that I wanted a quality device, one that I could use immediately to produce reasonable recordings. I also did not want to invest in more equipment to interface the microphone to the digital mode of recording with the computer. I discovered that this meant I was looking for a USB microphone, one that simply plugs into the side USB socket on most laptops or towers.[1] Several were available, and I found many reviews that included sound samples on YouTube.com. The one I settled on was the Yeti, by Blue Microphones. It runs for a little under $100.00 U.S. on Amazon.com. I was impressed by its ability to give a wonderfully rich, realistic sound quality to acoustic guitar and vocal recordings in several of the reviews.
The Yeti is a multipurpose microphone, with four settings that allow for recording in different directions. Basically, if you purchase this, you purchase three microphones in one. It is a condenser mic, which means that it is highly sensitive and can pick up a great deal of sound. Details can be found on the Internet.
I now had my basic recording equipment, and the recording device in my laptop. What I needed to do next was turn my apartment into a studio. This was easier said than done.
Location is everything in real estate, and our location is in the midst of a noisy, downtown Chicago neighborhood. Since I couldn’t call mayor Emanuel and ask him to stop the traffic near our high rise, I needed to isolate that noise from my highly sensitive microphone. Before I did this, I also needed to experiment with levels and the distance of the microphone from my harp. I purchased a microphone stand along with the Yeti. This allowed me to elevate the microphone some distance above the harp, picking up more of the natural reverb of the room. Adjusting the gain (volume) nob on the Yeti helped me reach a good recording level. However, street noise was still apparent in the background.
My first tests were in our large living room. It is spacious enough to move equipment around, and place the microphone in several different locations. However, those pesky street noises were still apparent. No amount of effects in Garage Band could reduce their presence. The next step was to try other rooms. Our apartment gets lots of sunlight, due to large, wall–sized windows. They are thick, but sound vibrations are continuously conducted through them. Moving to the bedroom did not work, lots of noise, there. The bathroom was the next option.
Now, I’m asking you to not imagine me, the harp, and the recording equipment in the bathroom. Do not laugh; bathroom tile creates a fine, natural reverb. It was not the exact reverb that I was looking for, I actually wanted more control over my recording, and thus wanted a “dryer” sound; i.e., only the natural sustain of the instrument. Taking this approach allows one to control the sound quality during mixing.
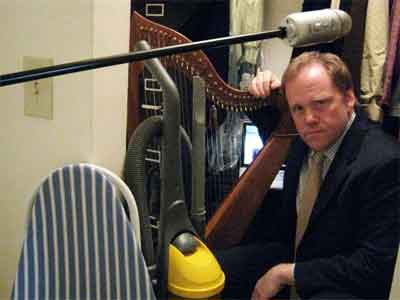
At Work in the Studio: No Jacket Required
Since our kitchen is too small, and open to the living room, I had one option left in our apartment, the walk–in closet. Now that my name has been mentioned in conjunction with bathrooms and closets, a U.S. political career for me is no longer viable option. Those of you living in The States will understand.
All jests aside, this room proved to be the perfect option for me. The door can be closed while sitting in it, and it is sound-proofed with our winter coats, shoes, my wife–s knitting storage, and her saris. Not only do they help her to look stunning at Indian family functions, but they now also help me to keep the ambient noise of the city away from my microphone. Due to the limited space, I could not set the Yeti on the stand, but I was able to elevate it some distance above away from me on a filing cabinet, and readjust the gain to match the earlier volume level.
I trust that this description of my trial–and–error process has amused you, and will be of use to you. You can see that, far from being a mysterious science, your results will be predicated on ingenuity, and creative use of what is available to you. If you have a larger dwelling place, or at least one that is not confounded by extemporaneous noise, you will probably find recording your harp a lot less difficult.
My solutions are not the only ones possible. If I had more space and budget, I would likely use another microphone closer to the harp for a basic track, and the Yeti to record an ambient, reverb track for the room. After discussions with another home audio engineer, I was able to produce this effect electronically in the mixing process by duplicating the tracks and adding effects in Garage Band. However, I would have liked to have the former option.
The above process took me a short period of about one month, in between work and graduate school. I have omitted a description of the details of mixing tracks, and creating mp3 files, as they would be too application specific; you may use a different recording application from the one I used.
I think that it is important to seek out others who have experimented with home recording. I have had contact with old friends who have continued making and recording music over the years. Hearing about a friend setting up a portable tent as a sound isolation booth in a hotel in Singapore to record with a local street musician was extremely inspiring for me. It kept me looking for creative ways to work within my limitations.
There are several places on the web to upload and share your music. You can find some of Scott Hoye’s recordings at soundcloud.com. His hope is that, with a little effort, you too will find that your harp’s voice can be available for the wide world to enjoy.
[1] Editor’s note: An option if you already own a good microphone is to purchase an in-line USB converter.
Submitted by Scott Hoye, August 2, 2011
Except where otherwise noted, content on this site is licensed under a Creative Commons License.
Permissions beyond the scope of this license may be available by contacting us at editor@wirestrungharp.com.
